Core Animation (七)3DTransform
20 Oct 20133D Transform
3D Transform
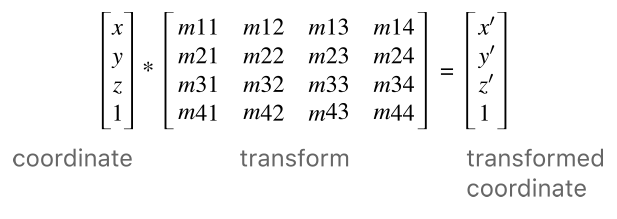
CGAffineTransform 属于 Core Graphics Framework ,Core Graphic是一个绘制2D图形的库。CGAffineTransform 只提供 2D 的旋转缩放移动等。我们要想实现 3D矩阵下的旋转缩放就要用到CATransform3D。在2D动画中,point属性只有 X Y 值,在3D坐标中,多了一个 Z 值。它代表的是当前的Layer距离用户视角的远近,正是这个Z值 使我们可以在3D坐标系中旋转缩放移动。
CATransform3D 跟 CGAffineTransform 一样也是个矩阵,是一个 4x4 的矩阵结构定义如下。
struct CATransform3D
{
  CGFloat m11, m12, m13, m14;
  CGFloat m21, m22, m23, m24;
  CGFloat m31, m32, m33, m34;
  CGFloat m41, m42, m43, m44;
};
typedef struct CATransform3D CATransform3D;
3D转换的计算如下。
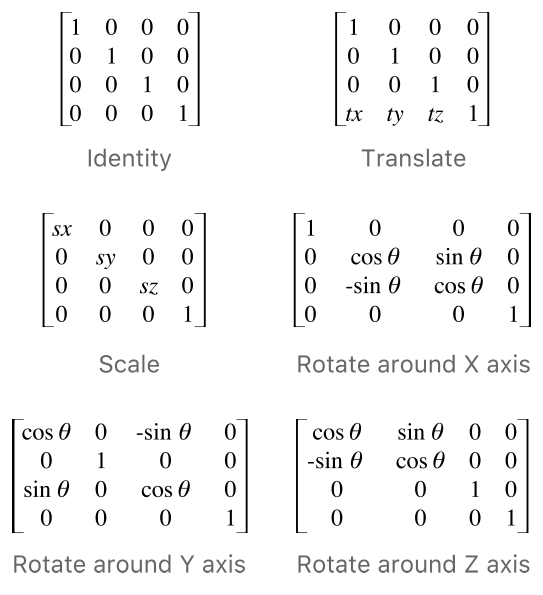
下面是几种常用的3D变换矩阵 跟 CGAffineTransform 矩阵非常相似
Core Graphic 提供了一些列的函数使我们可以方便简单的实现 3D变换。
CATransform3DMakeRotation(angle,x,y,z);
CATransform3DMakeScale(sx,sy,sz);
CATransform3DMakeTranslation(tx,ty,tz);
我们看下面这个例子
UIImage *image = [UIImage imageNamed:@"DragonMedium"];
UIImageView *imageView = [[UIImageView alloc] initWithImage:image];
imageView.backgroundColor = [UIColor greenColor];
imageView.frame = CGRectMake(0, 0 , CGRectGetWidth(imageView.frame),
                             CGRectGetHeight(imageView.frame));
imageView.center = self.view.center;

CATransform3D transform = CATransform3DMakeRotation(M_PI_4, 0, 1, 0);
imageView.layer.transform = transform;
[self.view addSubview:imageView];

好像只是简单的压缩了宽度。并没有出现我们预期的3D 沿 Y轴旋转的效果,这是为什么呢。我们知道,要想在2D平面表现3D效果,无论是拍照,还是绘画都要用到一个叫做透视法的东西,当我们距离一个物体越远的时候,我们看它就越小,在CATransform3D有一个值是控制透视效果的,就是 m34 .默认的情况下 m34的值是零,意味着我们是在元素的角度看到UI,我们把上面的代码稍加改造。
CATransform3D transform =   CATransform3DIdentity;
transform.m34 = -1.0 / 500.0;
transform = CATransform3DRotate(transform,M_PI_4, 0, 1, 0);
imageView.layer.transform = transform;

这次看上去就对了。我们将m34 的值设为 -1.0/d .d 表示的就是虚拟的摄像头跟屏幕的距离,因为摄像头并不是真的存在,这个值通常是靠感觉来调整的,一般来说 500 到 1000 都是不错的值。 可以多尝试几次。
消失点
艺术家或者工程师在纸上表现立体图时,常用一种透视法,这种方法源于人们的视觉经验:大小相同的物体,离你较近的看起来比离你较远的大。如当你沿着铁路线去看两条铁轨,沿着公路线去看两边排列整齐的树木时,两条平行的铁轨或两排树木连线交与很远很远的某一点,这点在透视图中叫做消失点。 凡是平行的直线都消失于无穷远处的同一个点,消失于视平线上的点的直线都是水平直线。(百度百科)

在2D的 transform 中我们知道做变换的Layer都有一个锚点。在3D变换中,消失点就相当于一个锚点。 当我们在3D坐标系中,每次更改Layer的位置,同时也就更改消失点的位置。如果我们打算通过调整一个Layer 的 M34 来显示3D效果,那么 我们应该把先消失点定位在屏幕的中心,然后移动它到相应的位置,使得屏幕上所有的Layer可以共享同一个消失点。已达到一个整体的3D效果。
sublayerTransform
如果我们有多个View或者Layer的时候,并且它们每一个都有单独的3D变换,这时候我们有必要使用统一的M34的值,来保证它们在屏幕上显示的时候有个共同的消失点。
CALayer有个属性叫做 sublayerTransform 它也是一个 CATransform3D ,它只是在变换的时候作用于 subLayer 。这意味着我们可以在superLayer上设置变换,subLayer都将自动继承。消失点会设置在superLayer上,也就不必在单独给每一个subLayer设置消失点了。 我们看下面这个栗子。
UIView *superImageView = [[UIView alloc] initWithFrame:CGRectMake(0, 0, 320, 200)];
superImageView.backgroundColor = [UIColor redColor];
superImageView.center = self.view.center;

UIImage *image = [UIImage imageNamed:@"DragonMedium"];
UIImageView *leftimageView = [[UIImageView alloc] initWithImage:image];
UIImageView *rightImageView = [[UIImageView alloc] initWithImage:image];
leftimageView.backgroundColor = [UIColor greenColor];
rightImageView.backgroundColor = [UIColor greenColor];
leftimageView.frame = CGRectMake(0, 25 , 150,150);
rightImageView.frame = CGRectMake(170, 25 ,150,150);

[superImageView addSubview:leftimageView];
[superImageView addSubview:rightImageView];


CATransform3D superTransform = CATransform3DIdentity;
superTransform.m34 = -1.0/500.0;
superImageView.layer.sublayerTransform = superTransform;

CATransform3D transformLeft = CATransform3DMakeRotation(M_PI_4, 0, 1, 0);
CATransform3D transformRight = CATransform3DMakeRotation(M_PI_4, 0, -1, 0);
leftimageView.layer.transform = transformLeft;
rightImageView.layer.transform = transformRight;

[self.view addSubview:superImageView];

镜像
当我们把上面得例子中得rightImageView的transform 去掉。leftImageView的 弧度参数从MPI4 变成 M_PI 。发生了什么?

我们得到了一个Layer的镜像。在3D变幻中有时候这种反面的镜像的计算和绘制是没有必要的,比如在一个不透明的物体做3D变幻的时候。对于背面的东西既然是不可见的也就没必要浪费资源显示。所以 CALayer有个属性叫做 doubleSided 可以关掉。
当一个Layer和它所包含的Layer做相反的变换会发生什么呢?
我们现在试着把superLayer向右旋转 45度,把subLayer向左旋转45度。
UIView *superImageView = [[UIView alloc] initWithFrame:CGRectMake(0, 0, 200, 200)];
superImageView.backgroundColor = [UIColor redColor];

UIImage *image = [UIImage imageNamed:@"DragonMedium"];
UIImageView *imageView = [[UIImageView alloc] initWithImage:image];
imageView.backgroundColor = [UIColor greenColor];
imageView.frame = CGRectMake(0,0 ,150,150);
imageView.center = superImageView.center;

[superImageView addSubview:imageView];
superImageView.center = self.view.center;

CATransform3D transformLeft = CATransform3DMakeRotation(M_PI_4, 0, 0, 1);
CATransform3D transformRight = CATransform3DMakeRotation(-M_PI_4, 0, 0, 1);
superImageView.layer.transform = transformLeft;
imageView.layer.transform = transformRight;

[self.view addSubview:superImageView];

我们在试试3D显示。将上面栗子中的3D transform 修改成下面这样
CATransform3D transformLeft = CATransform3DIdentity;
transformLeft.m34 = -1.0 / 500.0;
transformLeft = CATransform3DRotate(transformLeft, M_PI_4, 0, 1, 0);

CATransform3D transformRight = CATransform3DIdentity;
transformRight.m34 = -1.0 / 500.0;
transformRight = CATransform3DRotate(transformRight, -M_PI_4, 0, 1, 0);

superImageView.layer.transform = transformLeft;
imageView.layer.transform = transformRight;
 我们发现绿色部分的变换比以前例子中的效果来变形的非常厉害,这是因为在做3D变换的时候每个Layer的坐标系都是以superLayer为参照的。也就是说 红色Layer跟绿色Layer并不在同一个参照系里。当我们要用 Core Animation创建一些复杂的3D效果的时候,要注意这点。