Core Image 人脸检测
27 Mar 2014Core Image可以对图像进行分析,并找到图片中人脸的位置。Core Image检测出人脸后,可以提供面部特性,比如眼睛和嘴的位置。它还可以跟踪视频中人脸的位置。
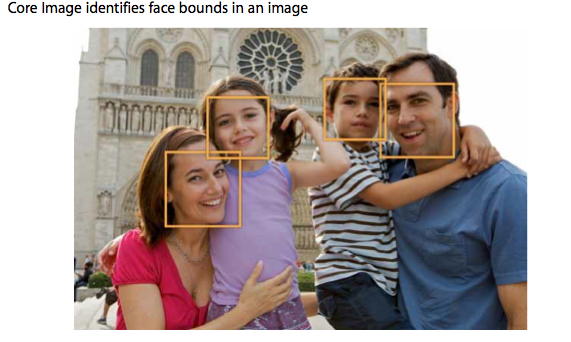
下面我们看看如何实现人脸检测。
UIImage *baby = [UIImage imageNamed:@"1.jpg"];
CGFloat scale = 320.0/baby.size.width;
CIImage *myimage = [CIImage imageWithCGImage:baby.CGImage];
CIContext *context = [CIContext contextWithOptions:nil];
CIDetector *detector = [CIDetector detectorOfType:CIDetectorTypeFace context:context options:@{CIDetectorAccuracy:CIDetectorAccuracyHigh}];
NSArray *features = [detector featuresInImage:myimage];
for (CIFaceFeature *faceFeature in features){
CGRect bounds = faceFeature.bounds;
bounds.origin.x *= scale;
bounds.origin.y *= scale;
bounds.size.width *= scale;
bounds.size.height *= scale;
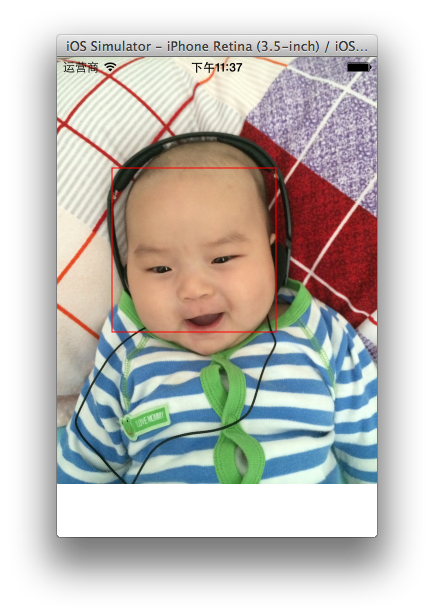
UIView *faceView = [[UIView alloc] initWithFrame:bounds];
faceView.backgroundColor = [UIColor clearColor];
faceView.layer.borderWidth = 1;
faceView.layer.borderColor = [UIColor redColor].CGColor;
[self.imageView addSubview:faceView];
}
此外,我们还可以拿到眼睛跟嘴巴的位置
if (faceFeature.hasLeftEyePosition)
    NSLog(@"Left eye %@",NSStringFromCGPoint(faceFeature.leftEyePosition));
if (faceFeature.hasRightEyePosition)
    NSLog(@"Right eye %@",NSStringFromCGPoint(faceFeature.rightEyePosition));
if (faceFeature.hasMouthPosition)
    NSLog(@"Mouth %@", NSStringFromCGPoint(faceFeature.mouthPosition));
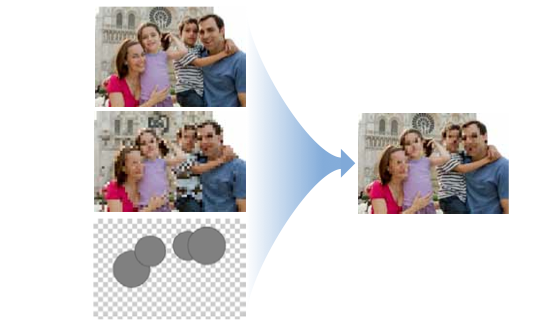
利用Core Image 进行脸部打码
 要实现这个效果,分下面几步。
- 首先我们要生成一张像素化的图像。
- 然后我们找到图像中人脸的位置,生成一张遮罩图片。
- 然后我们把像素图片和遮罩图片合成一张图片并且使用原图做为背景。
像素图片
UIImage *baby = [UIImage imageNamed:@"1.jpg"];
CIImage *myimage = [CIImage imageWithCGImage:baby.CGImage];
CGFloat scale = MAX(baby.size.width, baby.size.height)/60;
CIImage *pixlImage =[CIFilter filterWithName:@"CIPixellate" keysAndValues:kCIInputImageKey,myimage,kCIInputScaleKey,@(scale),nil].outputImage;
脸部遮罩图片
CIImage *maskImage = nil;
CIContext *context = [CIContext contextWithOptions:nil];
CIDetector *detector = [CIDetector detectorOfType:CIDetectorTypeFace context:context options:@{CIDetectorAccuracy:CIDetectorAccuracyHigh}];
NSArray *features = [detector featuresInImage:myimage];

for (CIFaceFeature *faceFeature in features){
    CGFloat centerX = faceFeature.bounds.origin.x + faceFeature.bounds.size.width / 2.0;
    CGFloat centerY = faceFeature.bounds.origin.y + faceFeature.bounds.size.height / 2.0;
    CGFloat radius = MIN(faceFeature.bounds.size.width, faceFeature.bounds.size.height) / 1.5;
    CIFilter *radialGradient = [CIFilter filterWithName:@"CIRadialGradient" keysAndValues:@"inputRadius0", @(radius),@"inputRadius1", @(radius + 1.0f),@"inputColor0", [CIColor colorWithRed:0.0 green:1.0 blue:0.0 alpha:1.0],@"inputColor1", [CIColor colorWithRed:0.0 green:0.0 blue:0.0 alpha:1.0],kCIInputCenterKey, [CIVector vectorWithX:centerX Y:centerY],nil];
    CIImage *circleImage = [radialGradient valueForKey:kCIOutputImageKey];
    if (nil == maskImage)
        maskImage = circleImage;
    else
        maskImage = [[CIFilter filterWithName:@"CISourceOverCompositing" keysAndValues:kCIInputImageKey, circleImage,kCIInputBackgroundImageKey, maskImage,nil] valueForKey:kCIOutputImageKey];
    }
}
合成最终的图片
CIImage *resultImage =[CIFilter filterWithName:@"CIBlendWithMask" keysAndValues:kCIInputImageKey,pixlImage,@"inputMaskImage",maskImage,@"inputBackgroundImage",myimage,nil].outputImage;
