29 Mar 2014
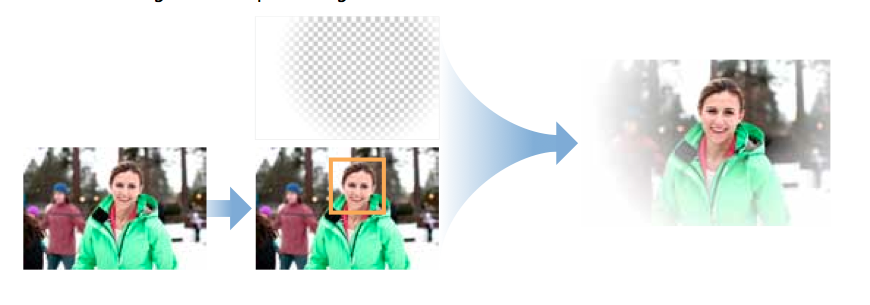
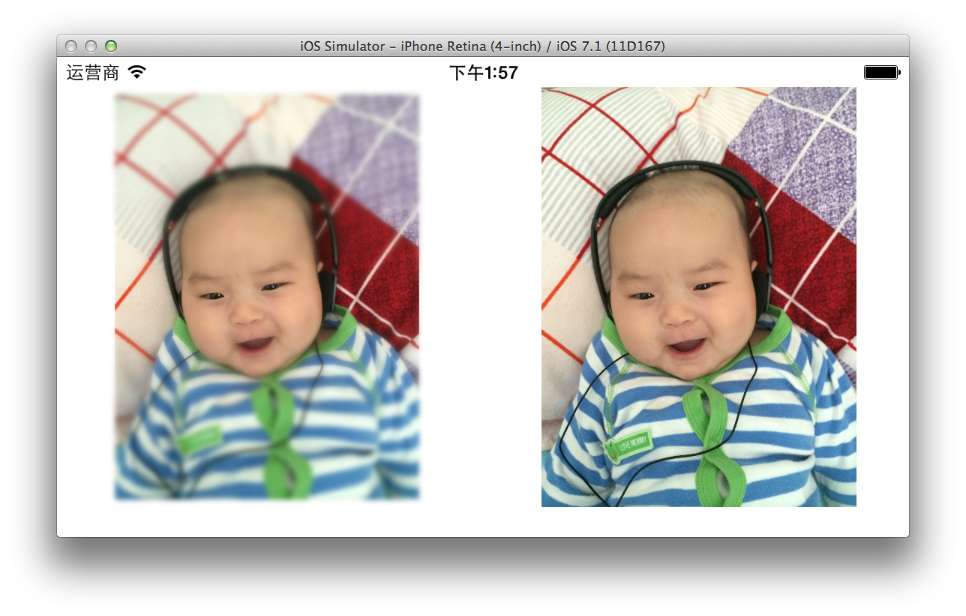
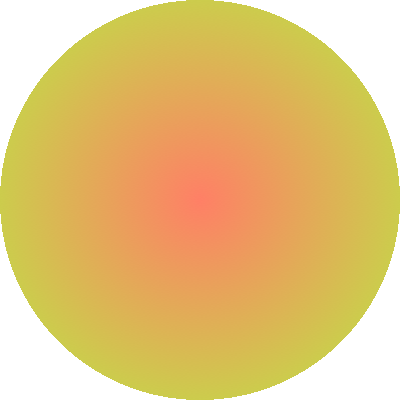
围绕着脸部周围添加一个白色阴影渐变
- 找到图像中的人脸
- 在CIRadialGradient上以人脸为中心,创建一个遮罩图片
- 将这遮罩图片与原始图片混合
 1 CIContext *context = [CIContext contextWithOptions:nil];
 2 UIImage *baby = [UIImage imageNamed:@"baby.jpg"];
 3 CIImage *myImage = [CIImage imageWithCGImage:baby.CGImage];
 4 CIDetector *detector = [CIDetector detectorOfType:CIDetectorTypeFace context:context options:@{CIDetectorAccuracy:CIDetectorAccuracyHigh}];
 5 NSArray *features = [detector featuresInImage:myImage];
 6 CIFaceFeature *faceFeature = [features firstObject];
 7 CGFloat centerX = faceFeature.bounds.origin.x+faceFeature.bounds.size.width / 2.0;
 8 CGFloat centerY = faceFeature.bounds.origin.y+faceFeature.bounds.size.height / 2.0;
 9 CGFloat radius = MIN(faceFeature.bounds.size.width,faceFeature.bounds.size.height) / 1.5;
10 CIFilter *radialGradient = [CIFilter filterWithName:@"CIRadialGradient"keysAndValues:
11                          @"inputRadius0", @(baby.size.width*2/3),
12                          @"inputRadius1", @(radius + 10.0f),
13                          @"inputColor0", [CIColor colorWithRed:1.0 green:1.0 blue:1.0 alpha:1.0],
14                          @"inputColor1", [CIColor colorWithRed:1.0 green:1.0 blue:1.0 alpha:0.0],
15                          kCIInputCenterKey, [CIVector vectorWithX:centerX Y:centerY],nil];
16 CIFilter *compositing = [CIFilter filterWithName:@"CISourceOverCompositing" keysAndValues:
17                          kCIInputImageKey,radialGradient.outputImage,
18                          kCIInputBackgroundImageKey,myImage,nil];
19 CGImageRef cgImage = [context createCGImage:compositing.outputImage fromRect:CGRectMake(0, 0, baby.size.width, baby.size.height)];
20 UIImage *maskImage2 = [UIImage imageWithCGImage:cgImage];
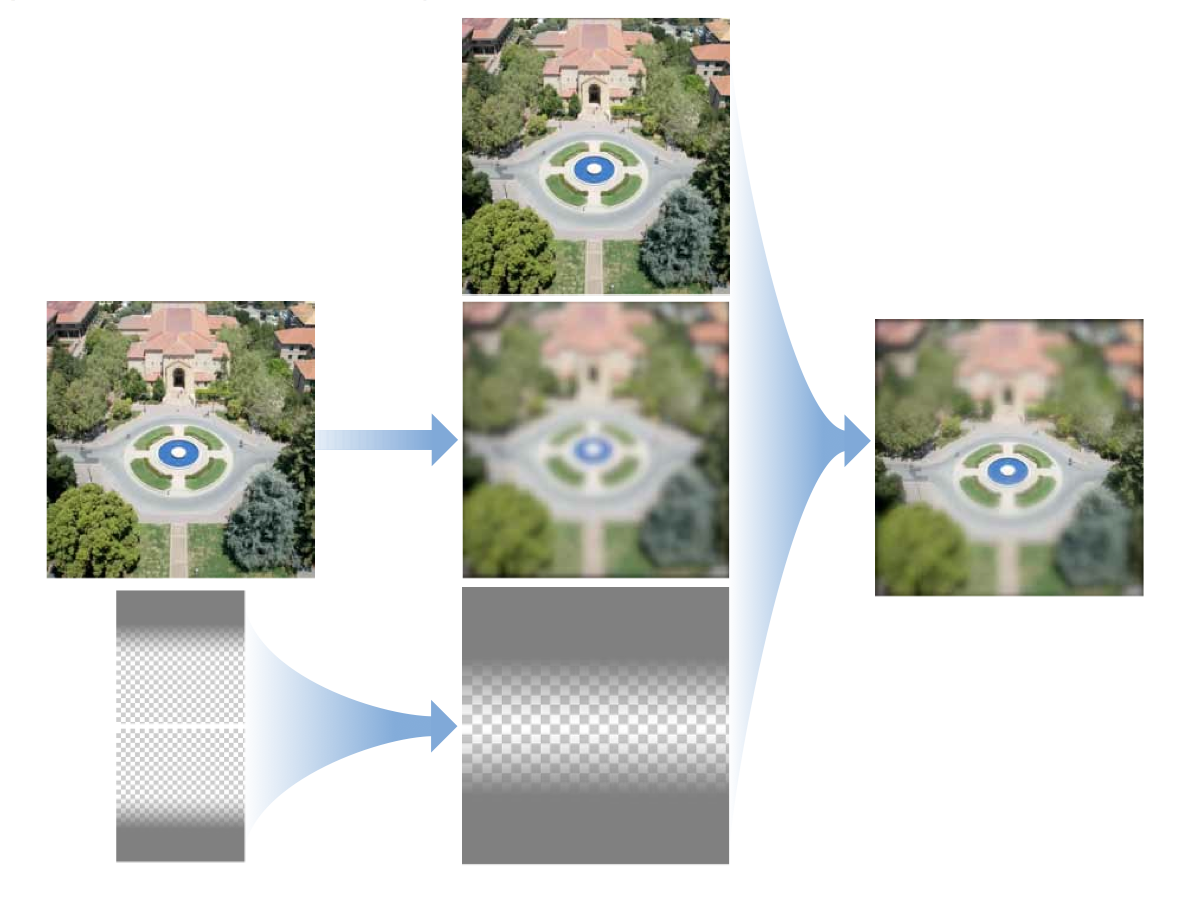
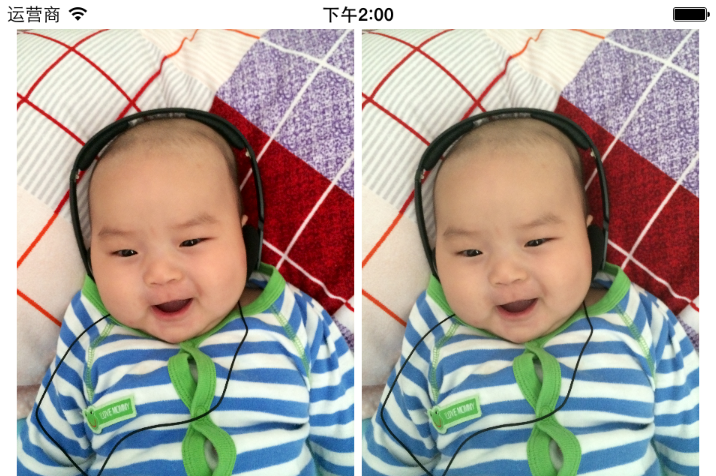
移轴效果的实现
- 实现移轴效果首先要生成一张模糊的图像。
- 然后生成两个线性渐变透明的图像,把它们拼在一起生成一张遮罩图像。
- 将原始图像模糊图像和遮罩图像混合在一起。
模糊的图像使用CIGaussianBlur生成
1 CIContext *context = [CIContext contextWithOptions:nil];
2 UIImage *baby = [UIImage imageNamed:@"baby.jpg"];
3 CIImage *myImage = [CIImage imageWithCGImage:baby.CGImage];
4 CIFilter *filter = [CIFilter filterWithName:@"CIGaussianBlur"];
5 [filter setValue:myImage forKey:kCIInputImageKey];
6 [filter setValue:@20 forKey:kCIInputRadiusKey];

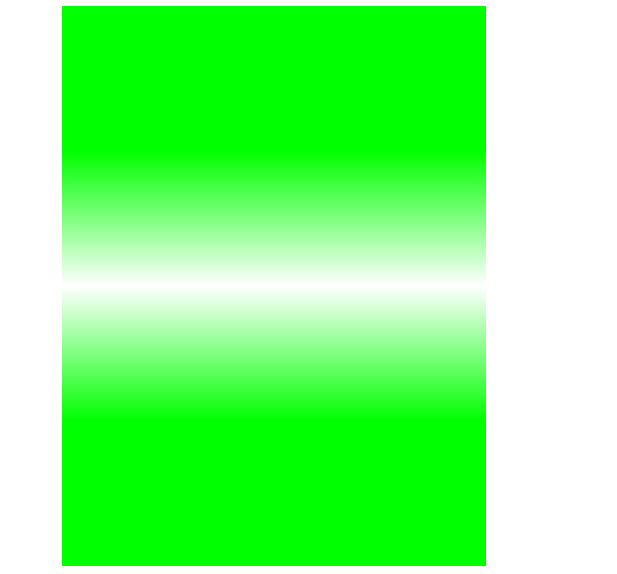
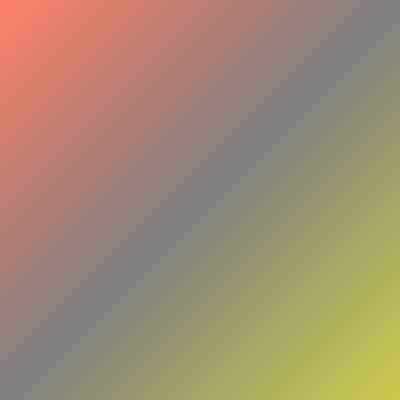
两个线性渐变的图像使用 CILinearGradient
从一个单色(如绿色或灰色)创建一个线性渐变,一幅从上倒下变化,另一幅从下到上渐变。然后把它们两个合成一张图像
 1 CIFilter *gradientfilter = [CIFilter filterWithName:@"CILinearGradient"];
 2 [gradientfilter setValue:[CIVector vectorWithX:0 Y:0.75*baby.size.height]    forKey:@"inputPoint0"];
 3 [gradientfilter setValue:[CIColor colorWithRed:0 green:1 blue:0 alpha:1] forKey:@"inputColor0"];
 4 [gradientfilter setValue:[CIVector vectorWithX:0 Y:0.5 *baby.size.height] forKey:@"inputPoint1"];
 5 [gradientfilter setValue:[CIColor colorWithRed:0 green:1 blue:0 alpha:0] forKey:@"inputColor1"];
 6
 7 CIFilter *gradientfilter2 = [CIFilter filterWithName:@"CILinearGradient"];
 8 [gradientfilter2 setValue:[CIVector vectorWithX:0 Y:0.25*baby.size.height]   forKey:@"inputPoint0"];
 9 [gradientfilter2 setValue:[CIColor colorWithRed:0 green:1 blue:0 alpha:1] forKey:@"inputColor0"];
10 [gradientfilter2 setValue:[CIVector vectorWithX:0 Y:0.5 *baby.size.height] forKey:@"inputPoint1"];
11 [gradientfilter2 setValue:[CIColor colorWithRed:0 green:1 blue:0 alpha:0] forKey:@"inputColor1"];
12
13 CIFilter *compositingFilter = [CIFilter filterWithName:@"CIAdditionCompositing"];
14 [compositingFilter setValue:gradientfilter.outputImage forKey:kCIInputImageKey];
15 [compositingFilter setValue:gradientfilter2.outputImage    forKey:kCIInputBackgroundImageKey];
然后将模糊图像 原图 跟遮罩图像合成在一起。移轴效果比较合适处理建筑物照片人像效果不太好。
1 CIFilter *blendFilter = [CIFilter filterWithName:@"CIBlendWithMask"];
2 [blendFilter setValue:blurFilter.outputImage    forKey:kCIInputImageKey];
3 [blendFilter setValue:myImage forKey:kCIInputBackgroundImageKey];
4 [blendFilter setValue:compositingFilter.outputImage forKey:kCIInputMaskImageKey];
28 Mar 2014
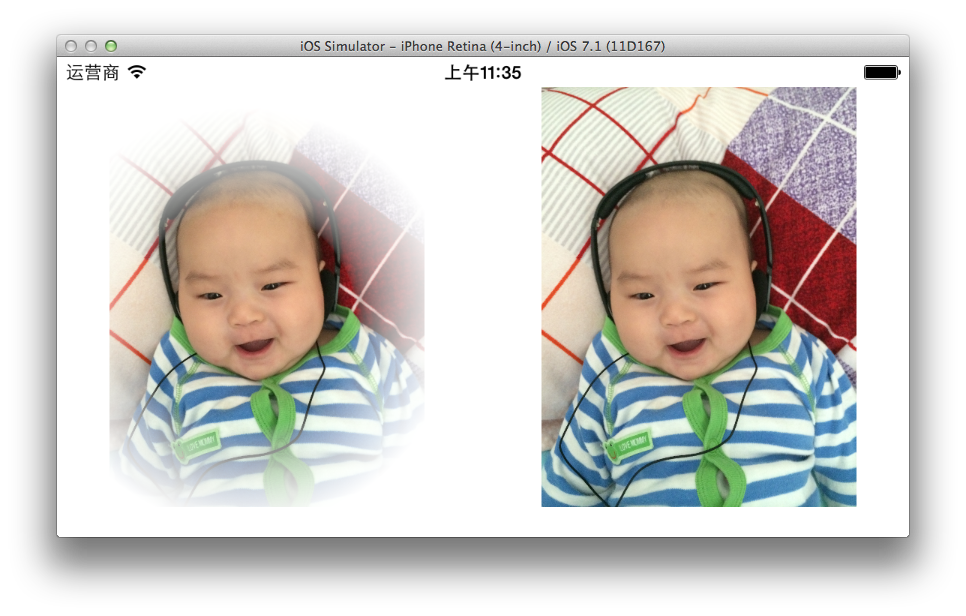
Core Image的自动强图片效果,会分析图像的直方图,图像属性,脸部区域,然后通过一组滤镜来改善图片效果。
自动增强滤镜
下面这些滤镜可以修正照片中的大部分问题:
| Filter |
Purpose |
| CIRedEyeCorrection |
Repairs red/amber/white eye due to camera flash |
| CIFaceBalance |
Adjusts the color of a face to give pleasing skin tones |
| CIVibrance |
Increases the saturation of an image without distorting the skin tones |
| CIToneCurve |
Adjusts image contrast |
| CIHighlightShadowAdjust |
Adjusts shadow details |
自动增强API仅有2个方法:autoAdjustmentFilters 和 autoAdjustmentFiltersWithOptions: . 多数情况下,我们使用带参数的方法。
- 图像的方向 :对于
CIRedEyeCorrection和CIFaceBalance滤镜,提供图像方向可以使Core Image 更精确的定位到脸的位置。
- 是否应用红眼校正把
kCIImageAutoAdjustEnhance设置为false)
- 是否使用红眼校正以外的全部其他滤镜。(把
kCIImageAutoAdjustRedEye设置为false)
通过autoAdjustmentFiltersWithOptions我们会得到一个包含图像增强的所有的滤镜的数组。依次调用它们处理图像。
1 CIContext *context = [CIContext contextWithOptions:nil];
2 UIImage *baby = [UIImage imageNamed:@"1.jpg"];
3 CIImage *myImage = [CIImage imageWithCGImage:baby.CGImage];
4 NSArray *adjustments = [myImage autoAdjustmentFilters];
5 for (CIFilter *filter in adjustments) {
6   [filter setValue:myImage forKey:kCIInputImageKey];
7   myImage = filter.outputImage;
8 }
左图就是自动增强之后的效果。
负片滤镜
1 CIFilter *filter = [CIFilter filterWithName:@"CIColorMatrix" keysAndValues:
2                   kCIInputImageKey, myImage,
3                   @"inputRVector", [CIVector vectorWithX: -1 Y:0 Z:0],
4                   @"inputGVector", [CIVector vectorWithX:0 Y:-1 Z:0 ],
5                   @"inputBVector", [CIVector vectorWithX: 0 Y:0 Z:-1],
6                   @"inputBiasVector", [CIVector vectorWithX:1 Y:1 Z:1],nil];
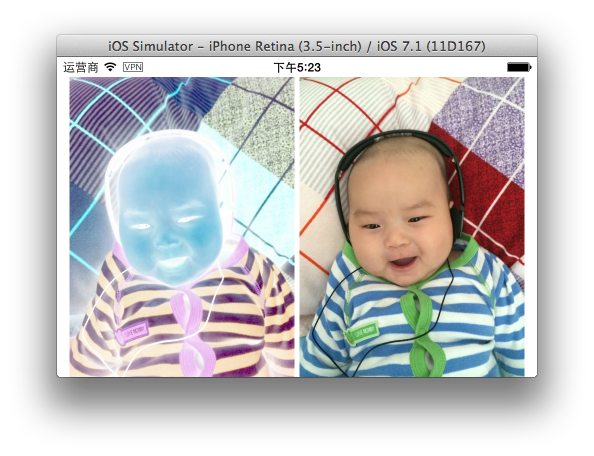
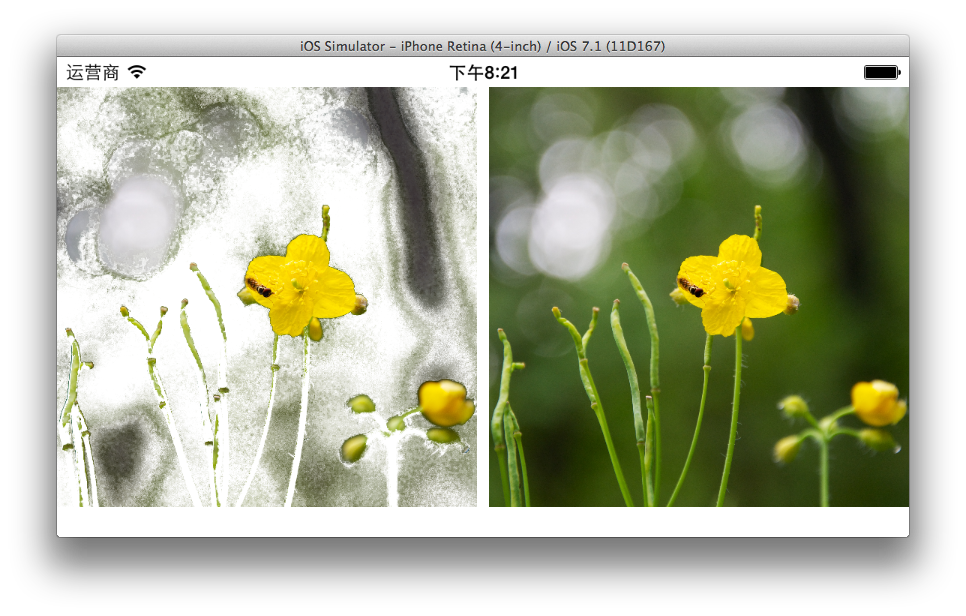
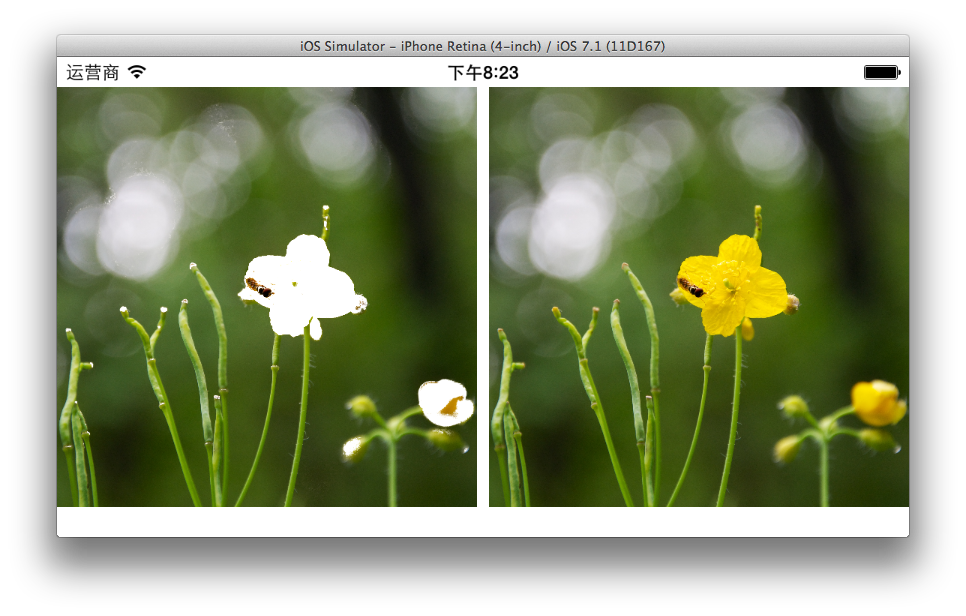
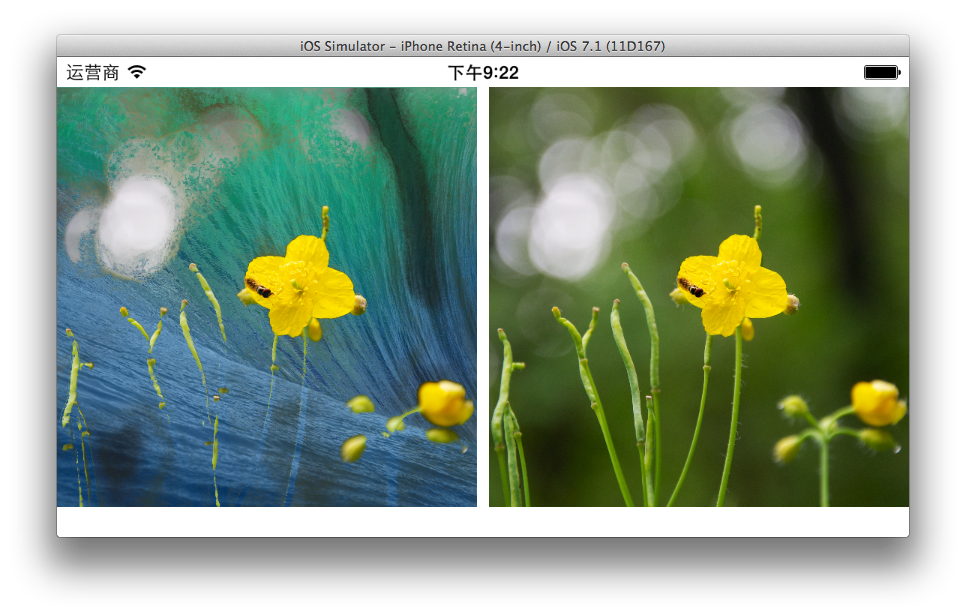
扣图滤镜
我们可以删除一幅图像中指定的颜色,然后填充一个背景。类似好莱坞大片的背景合成。
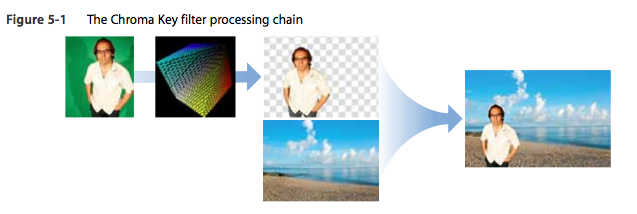
要实现上面图片的效果有下面几个步骤
- 首先我们要从图像中删除我们要删掉的颜色,通过创建一个颜色矩阵,将要删除的颜色变换成透明色。
- 用
CICOlorCube 滤镜删除图像中通过矩阵变换过的颜色。
- 最后用
CISourceOverCompositing 合成图片。
创建一个 color Cube Map
一个color cube是一个3D颜色查找表(lookup table)。Core Image 滤镜 CIColorCube 使用色值作为输入,并应用一个查找表到这些色值。
CIColorCube从图像中删除所有的绿色。就是要把图中的把绿色的alpha值设置为0.0(透明)。
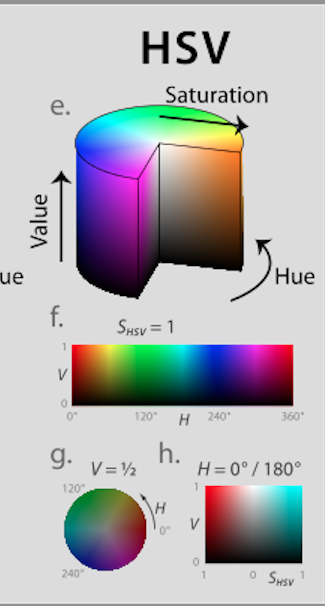
“绿色”包括一定范围内的颜色。最直接的处理方式是把图像的色值从RGBA转为HSV。HSV把颜色描述在圆柱坐标系内的点。
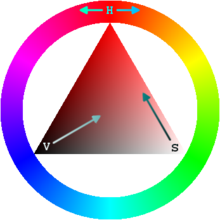
要删除绿色,你需要定义围绕中心点的最小和最大的角度。之后,对于任何的绿色,将其alpha值设置为0.0。纯绿的相对角度是120º。最小值和最大值要以这个值为中心。
Cube map数据必须预乘alpha,所以创建cube map的最后一步是把RGB值乘以你刚刚计算出的alpha值(如果是绿色,就是0,如果不是就是1.0) 下面是例子代码。
 1 CIContext *context = [CIContext contextWithOptions:nil];
 2 UIImage *baby = [UIImage imageNamed:@"2.jpg"];
 3 CIImage *myImage = [CIImage imageWithCGImage:baby.CGImage];
 4 // Allocate memory
 5 const unsigned int size = 64;
 6 float *cubeData = (float *)malloc (size * size * size * sizeof (float) * 4);
 7 float rgb[3], hsv[3], *c = cubeData;
 8
 9 // Populate cube with a simple gradient going from 0 to 1
10 for (int z = 0; z < size; z++){
11  rgb[2] = ((double)z)/(size-1); // Blue value
12  for (int y = 0; y < size; y++){
13      rgb[1] = ((double)y)/(size-1); // Green value
14      for (int x = 0; x < size; x ++){
15          rgb[0] = ((double)x)/(size-1); // Red value
16          // Convert RGB to HSV
17          // You can find publicly available rgbToHSV functions on the Internet
18          RGBtoHSV(rgb[0],rgb[1],rgb[2], &hsv[0],&hsv[1],&hsv[2]);
19
20          float alpha = (hsv[0] > 80 && hsv[0] < 130) ? 0.0f:1.0f;
21          // Calculate premultiplied alpha values for the cube
22          c[0] = rgb[0] * alpha;
23          c[1] = rgb[1] * alpha;
24          c[2] = rgb[2] * alpha;
25          c[3] = alpha;
26          c += 4;
27      }
28  }
29 }
30 // Create memory with the cube data
31 NSData *data = [NSData dataWithBytesNoCopy:cubeData length:(size * size * size * sizeof (float) * 4) freeWhenDone:YES];
32 CIFilter *colorCube = [CIFilter filterWithName:@"CIColorCube"];
33 [colorCube setValue:@(size) forKey:@"inputCubeDimension"];
34 [colorCube setValue:myImage forKey:@"inputImage"];
35 [colorCube setValue:data forKey:@"inputCubeData"];
36 myImage = colorCube.outputImage;
37
38 void RGBtoHSV( float r, float g, float b, float *h, float *s, float *v ){
39  float min, max, delta;
40  min = MIN( r, MIN(g, b) );
41  max = MAX( r, MAX(g, b) );
42  *v = max;                // v
43  delta = max - min;
44  if( max != 0 )
45      *s = delta / max;      // s
46  else {
47  // r = g = b = 0       // s = 0, v is undefined
48      *s = 0;
49      *h = -1;
50      return;
51  }
52  if( r == max )
53      *h = ( g - b ) / delta;        // between yellow & magenta
54  else if( g == max )
55      *h = 2 + ( b - r ) / delta; // between cyan & yellow
56  else
57      *h = 4 + ( r - g ) / delta; // between magenta & cyan
58  *h *= 60;               // degrees
59  if( *h < 0 )
60      *h += 360;
61 }
我们可以根据 HSV角度试试删除黄色
float alpha = (hsv[0] > 30 && hsv[0] < 55) ? 0.0f:1.0f;
删除指定的颜色后,我们可以填充一个背景图片。
1 UIImage *image2 = [UIImage imageNamed:@"5.png"];
2 CIImage *backgroundCIImage = [CIImage imageWithCGImage:image2.CGImage];
3 myImage = [[CIFilter filterWithName:@"CISourceOverCompositing" keysAndValues:kCIInputImageKey,myImage,kCIInputBackgroundImageKey,backgroundCIImage,nil] valueForKey:kCIOutputImageKey];
4 CGRect extent = [myImage extent];
5 CGImageRef cgImage = [context createCGImage:myImage fromRect:extent];
27 Mar 2014
Core Image可以对图像进行分析,并找到图片中人脸的位置。Core Image检测出人脸后,可以提供面部特性,比如眼睛和嘴的位置。它还可以跟踪视频中人脸的位置。
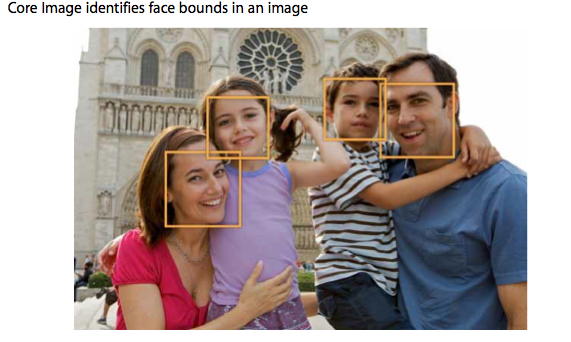
下面我们看看如何实现人脸检测。
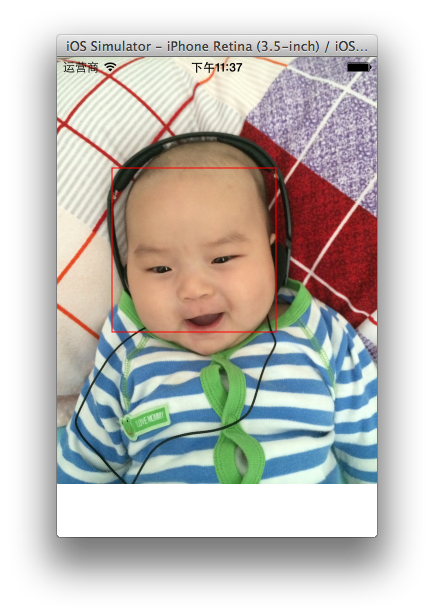
UIImage *baby = [UIImage imageNamed:@"1.jpg"];
CGFloat scale = 320.0/baby.size.width;
CIImage *myimage = [CIImage imageWithCGImage:baby.CGImage];
CIContext *context = [CIContext contextWithOptions:nil];
CIDetector *detector = [CIDetector detectorOfType:CIDetectorTypeFace context:context options:@{CIDetectorAccuracy:CIDetectorAccuracyHigh}];
NSArray *features = [detector featuresInImage:myimage];
for (CIFaceFeature *faceFeature in features){
    CGRect bounds = faceFeature.bounds;
    bounds.origin.x *= scale;
    bounds.origin.y *= scale;
    bounds.size.width *= scale;
    bounds.size.height *= scale;
    UIView *faceView = [[UIView alloc] initWithFrame:bounds];
    faceView.backgroundColor = [UIColor clearColor];
    faceView.layer.borderWidth = 1;
    faceView.layer.borderColor = [UIColor redColor].CGColor;
    [self.imageView addSubview:faceView];
}
此外,我们还可以拿到眼睛跟嘴巴的位置
if (faceFeature.hasLeftEyePosition)
    NSLog(@"Left eye %@",NSStringFromCGPoint(faceFeature.leftEyePosition));
if (faceFeature.hasRightEyePosition)
    NSLog(@"Right eye %@",NSStringFromCGPoint(faceFeature.rightEyePosition));
if (faceFeature.hasMouthPosition)
    NSLog(@"Mouth %@", NSStringFromCGPoint(faceFeature.mouthPosition));
利用Core Image 进行脸部打码
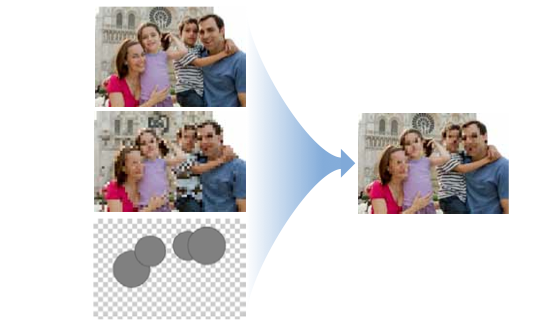 要实现这个效果,分下面几步。
- 首先我们要生成一张像素化的图像。
- 然后我们找到图像中人脸的位置,生成一张遮罩图片。
- 然后我们把像素图片和遮罩图片合成一张图片并且使用原图做为背景。
像素图片
UIImage *baby = [UIImage imageNamed:@"1.jpg"];
CIImage *myimage = [CIImage imageWithCGImage:baby.CGImage];
CGFloat scale = MAX(baby.size.width, baby.size.height)/60;
CIImage *pixlImage =[CIFilter filterWithName:@"CIPixellate" keysAndValues:kCIInputImageKey,myimage,kCIInputScaleKey,@(scale),nil].outputImage;
脸部遮罩图片
CIImage *maskImage = nil;
CIContext *context = [CIContext contextWithOptions:nil];
CIDetector *detector = [CIDetector detectorOfType:CIDetectorTypeFace context:context options:@{CIDetectorAccuracy:CIDetectorAccuracyHigh}];
NSArray *features = [detector featuresInImage:myimage];

for (CIFaceFeature *faceFeature in features){
    CGFloat centerX = faceFeature.bounds.origin.x + faceFeature.bounds.size.width / 2.0;
    CGFloat centerY = faceFeature.bounds.origin.y + faceFeature.bounds.size.height / 2.0;
    CGFloat radius = MIN(faceFeature.bounds.size.width, faceFeature.bounds.size.height) / 1.5;
    CIFilter *radialGradient = [CIFilter filterWithName:@"CIRadialGradient" keysAndValues:@"inputRadius0", @(radius),@"inputRadius1", @(radius + 1.0f),@"inputColor0", [CIColor colorWithRed:0.0 green:1.0 blue:0.0 alpha:1.0],@"inputColor1", [CIColor colorWithRed:0.0 green:0.0 blue:0.0 alpha:1.0],kCIInputCenterKey, [CIVector vectorWithX:centerX Y:centerY],nil];
    CIImage *circleImage = [radialGradient valueForKey:kCIOutputImageKey];
    if (nil == maskImage)
        maskImage = circleImage;
    else
        maskImage = [[CIFilter filterWithName:@"CISourceOverCompositing" keysAndValues:kCIInputImageKey, circleImage,kCIInputBackgroundImageKey, maskImage,nil] valueForKey:kCIOutputImageKey];
    }
}
合成最终的图片
CIImage *resultImage =[CIFilter filterWithName:@"CIBlendWithMask" keysAndValues:kCIInputImageKey,pixlImage,@"inputMaskImage",maskImage,@"inputBackgroundImage",myimage,nil].outputImage;

26 Mar 2014
我们在使用 AVFoundation 显示视频的时候,也可以使用 Core Image 进行事实渲染。
#import <UIKit/UIKit.h>
#import <GLKit/GLKit.h>
#import <AVFoundation/AVFoundation.h>
#import <CoreImage/CoreImage.h>
@interface ViewController : GLKViewController <AVCaptureVideoDataOutputSampleBufferDelegate> {
    AVCaptureSession *session;
    CIContext *coreImageContext;
}
@property (strong, nonatomic) EAGLContext *context;
@end

@implementation ViewController
@synthesize context = _context;
- (void)viewDidLoad{
    [super viewDidLoad];
    self.context = [[EAGLContext alloc] initWithAPI:kEAGLRenderingAPIOpenGLES2];
    GLKView *view = (GLKView *)self.view;
    view.frame = CGRectMake(0, 0, 640, 1136);
    view.context = self.context;
    view.drawableDepthFormat = GLKViewDrawableDepthFormat24;
    coreImageContext = [CIContext contextWithEAGLContext:self.context];

    NSError * error;
    session = [[AVCaptureSession alloc] init];
    [session beginConfiguration];
    [session setSessionPreset:AVCaptureSessionPreset640x480];
    AVCaptureDevice * videoDevice = [AVCaptureDevice defaultDeviceWithMediaType:AVMediaTypeVideo];
    AVCaptureDeviceInput *input = [AVCaptureDeviceInput deviceInputWithDevice:videoDevice error:&error];
    [session addInput:input];

    AVCaptureVideoDataOutput * dataOutput = [[AVCaptureVideoDataOutput alloc] init];
    [dataOutput setAlwaysDiscardsLateVideoFrames:YES];
    [dataOutput setVideoSettings:[NSDictionary dictionaryWithObject:[NSNumber numberWithInt:kCVPixelFormatType_32BGRA] forKey:(id)kCVPixelBufferPixelFormatTypeKey]];
    [dataOutput setSampleBufferDelegate:self queue:dispatch_get_main_queue()];

    [session addOutput:dataOutput];
    [session commitConfiguration];
    NSArray *array = [[session.outputs objectAtIndex:0] connections];
    for (AVCaptureConnection *connection in array){
        connection.videoOrientation = AVCaptureVideoOrientationPortrait;
    }
    [session startRunning];
}

-(void)captureOutput:(AVCaptureOutput *)captureOutput didOutputSampleBuffer:(CMSampleBufferRef)sampleBuffer fromConnection:(AVCaptureConnection *)connection {
    CVPixelBufferRef pixelBuffer = (CVPixelBufferRef)CMSampleBufferGetImageBuffer(sampleBuffer);
    CIImage *image = [CIImage imageWithCVPixelBuffer:pixelBuffer];
    CGRect rect = [image extent];
    rect.origin.y = 200;
    rect.size.width  =  640;
    rect.size.height  =  (640.0/480.0)*640;
    CIFilter *filter =[CIFilter filterWithName:@"CISepiaTone"];
    [filter setValue:image forKey:kCIInputImageKey];
    [filter setValue:@0.8 forKey:kCIInputIntensityKey];
    image = filter.outputImage;
    [coreImageContext drawImage:image inRect:rect fromRect:[image extent] ];
}
@end
24 Mar 2014
Quartz **提供了两种绘制渐变的数据类型,CGShadingRef** 和CGGradientRef 我们都可以始终这两种方式来绘制线性渐变或者辐射渐变。
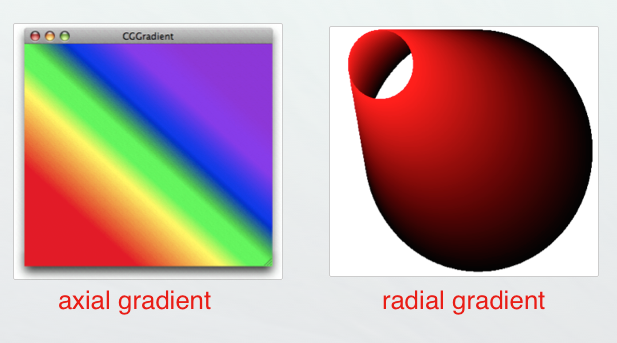
CGGradientRef
Painting an axial gradient using a CGGradient object
 1 UIGraphicsBeginImageContextWithOptions(CGSizeMake(200, 200),NO ,[UIScreen mainScreen].scale);
 2 CGContextRef context = UIGraphicsGetCurrentContext();
 3 size_t locations = 2;
 4 CGFloat location[2] ={0.0,1.0};
 5 CGFloat components[8] = {1.0,0.5,0.4,1.0,
 6                      0.8,0.8,0.3,1.0};
 7 CGColorSpaceRef colorSpace = CGColorSpaceCreateDeviceRGB();
 8 CGGradientRef mygradient  = CGGradientCreateWithColorComponents(colorSpace, components, location, locations);
 9 CGContextDrawLinearGradient (context,mygradient,CGPointMake(0.0, 0.0),CGPointMake(200.0, 200.0), 0);
10 UIImage *image = UIGraphicsGetImageFromCurrentImageContext();
11 UIGraphicsEndImageContext();
Painting a radial gradient using a CGGradient object
//CGContextDrawLinearGradient (context,mygradient,CGPointMake(0.0, 0.0),CGPointMake(200.0, 200.0), 0);
CGContextDrawRadialGradient (context,mygradient,CGPointMake(10.0, 10.0),10.0f,CGPointMake(150.0, 150.0),50.0f,kCGGradientDrawsBeforeStartLocation & kCGGradientDrawsAfterEndLocation);
CGContextDrawRadialGradient (context,mygradient,CGPointMake(100.0, 100.0),0.0f,CGPointMake(100.0, 100.0),100.0f,kCGGradientDrawsBeforeStartLocation & kCGGradientDrawsAfterEndLocation);
多个颜色渐变
size_t locations = 3;
CGFloat location[3] ={0.0,0.5,1.0};
CGFloat components[12] = {1.0,0.5,0.4,1.0,
                            0.5,0.5,0.5,1.0,
                            0.8,0.8,0.3,1.0};
用 Gradient 实现一个 iOS 6.0风格的高光按钮
我们继承UIButton 然后在 - (void)drawRect: 中 添加渐变效果
- (id)initWithFrame:(CGRect)frame
{
    self = [super initWithFrame:frame];
    if (self) {
        // Initialization code

        self.layer.cornerRadius = 8.0f;
        self.layer.masksToBounds = YES;
        self.layer.borderWidth = 1.0f;
        self.layer.borderColor = [UIColor colorWithWhite:0.5f alpha:0.2f].CGColor;
    }
    return self;
}

// Only override drawRect: if you perform custom drawing.
// An empty implementation adversely affects performance during animation.
- (void)drawRect:(CGRect)rect {
    CGContextRef ref = UIGraphicsGetCurrentContext();
    CGFloat locations[5] = {0.0,0.5,0.5,0.8,1.0};
    CFArrayRef colors = (__bridge CFArrayRef) @[(id)[UIColor colorWithWhite:1.0f alpha:0.6f].CGColor,
                            (id)[UIColor colorWithWhite:0.9f alpha:0.3f].CGColor,
                            (id)[UIColor colorWithWhite:0.75f alpha:0.2f].CGColor,
                            (id)[UIColor colorWithWhite:0.4f alpha:0.3f].CGColor,
                            (id)[UIColor colorWithWhite:1.0f alpha:0.2f].CGColor];
    CGColorSpaceRef colorSpc = CGColorSpaceCreateDeviceRGB();
    CGGradientRef gradient = CGGradientCreateWithColors(colorSpc, colors, locations);
    CGContextDrawLinearGradient(ref, gradient, CGPointMake(0.5, 0.0), CGPointMake(0.5, rect.size.height), kCGGradientDrawsAfterEndLocation);
    CGColorSpaceRelease(colorSpc);
    CGGradientRelease(gradient);
}
